Introduction to Git
Contents
- Introduction to Git
- What is version control?
- Core concepts
- Local, single-user, linear workflow
git init: create an empty repositorygit add: add content to the staging areagit commit: permanently record our changes in the repositorygit log: what has been committed so fargit diff: what have I changed?- The cycle of git: work, add, commit, ...
git logrevisitedgit mvandrm: moving and removing files
- Local, single-user, branching workflow
- Using remotes as a single user
- Conflict management
- Exercise: Single remote with shared access
- Learn more
Note
The content of this tutorial was adapted from Fernando Pérez’ Lecture notes (in IPython Notebook format) on Reproducible Science And Modern Scientific Software.
Before reading this, you will want to be familiar with the material in the “Basics of UNIX” tutorial and screencast here: http://statistics.berkeley.edu/computing/training/tutorials
In this tutorial, I will use a $ prompt for bash. To follow along, you
will need to have bash and git installed on your computer. If you are
using the BCE VM, you should have everything you need installed.
If you don’t have git installed, please see this for help.
You will also need a GitHub account to follow some of the examples using git remotes. If you don’t already have one, create a GitHub account here.
What is version control?
As a statistician, scientist, or engineer, you will work on projects that include code, data, and text. For trivially small and short-lived projects, it may suffice to keep track of the various files mentally. As the size and duration of your project grows, you will eventually need to adopt a system to track everything.
Consider the following example:
$ tree proj1
proj1
├── code
│   ├── analysis.py
│   ├── eda.py
│   └── preprocess.py
├── data
│   └── blob.dat
├── figs
│   └── diagram.png
├── paper
│   ├── Makefile
│   ├── report.bib
│   └── report.tex
└── slides
    └── presentation.md

5 directories, 9 files
Above I’ve displayed the directory tree for a project. Now suppose that I have
an idea about an alternative analysis to the one currently implemented in
proj1/code/analysis.py. I could manually backup the current analysis
script doing something like cp analysis.py analysis.py.orig. And then
start implementing the new analysis in analysis.py. While I am still
trying to debug my new analysis script, my advisor suggests a third alternative
approach, so now I create a third version analysis-advisor.py. The new
analysis methods each require that I conduct different preprocessing
steps, so now I create the following new files: preprocess-new.py and
preprocess-advisor.py. Now I just need to remember that
preprocess-new.py goes with analysis.py, preprocess.py goes with
analysis.py.orig, and preprocess-advisor.py goes with
analysis-advisor.py.
It is easy to further complicate this example. For instance, what if you are working on this project with several colleagues. Each member will want their own copy of the project and you will need a mechanism to share the files with one another. You might consider sharing the project using something like Dropbox. However, this will require care as it can be difficult to determine which changes will be synced when two people edit the same file at the same time.
Instead of manually trying to keep track of the changes you’ve made to code, data, and documents as indicated above, version control software helps you automate and manage this process. This has several benefits:
- allowing you to easily go back to earlier versions;
- allowing you to have multiple version you can switch between;
- allowing you to easily separate tentative new directions into different branches of work, which you can later discard or merge back into your main line of development;
- allowing you to share work easily without worrying about conflicts; and
- providing built-in backup.
To see how this works, we will now consider the basic operation of a popular and powerful version control system (VCS) called Git. First, we will need to develop some basic vocabulary needed to discuss how Git works. Then we will see how to use Git locally as a single-user using a linear workflow. We will then see how to use branches rather than following a simple linear workflow. Finally, we will discuss using remotes instead of just working locally including a short discussion of collaborative development with one shared remote.
Note
VCS come in two main architectures: client-server (e.g., CVS, Subversion) and distributed (e.g., Mercurial, Git). In the client-server architecture, there is one master repository and everyone working on the repository has their own minimal local copy of the master repository. In the distributed model, every repository is a complete repository and there are mechanisms for incorporating changes from remote repositories into a local repository.
Core concepts
The working tree (or directory) is the tree of files you are working on in the current directory. In the example above, we started with this working tree:
proj1
├── code
│   ├── analysis.py
│   ├── eda.py
│   └── preprocess.py
├── data
│   └── blob.dat
├── figs
│   └── diagram.png
├── paper
│   ├── Makefile
│   ├── report.bib
│   └── report.tex
└── slides
    └── presentation.md
A commit is a snapshot of an entire directory tree at a given point in time, some metadata (e.g., reference to previous commits, authors name), and an identifier (this is called a hash and will be discussed below). Returning to the above example, you would make a commit corresponding to the original state of the directory tree, which I listed. Committing the directory tree as listed above will allow us to return to this exact state later (by checking out that commit—as we will see—the working tree changed to contain exactly the files and directories that we originally committed).
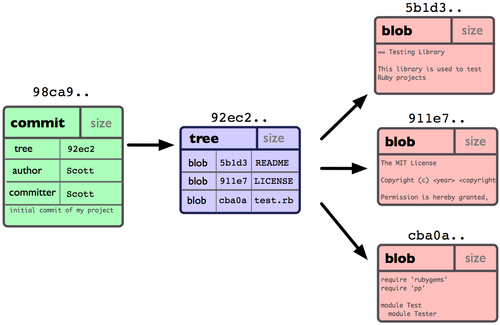
Here is a schematic representation of a commit. The commit, which I
refer to as 98ca9.., has some metadata (i.e., author name and committer
name) as well as a pointer to the entire directory tree.
A repository is essentially a group of linked commits, which form a directed acyclic graph (DAG), as well as a set of references to specific commits (we refer to these references to commits as heads). As part of the metadata of each commit, we include references to 0 or more parent commits. The initial commit of each repository has 0 parents. Each subsequent commit is proceeded by 1 or more commits.

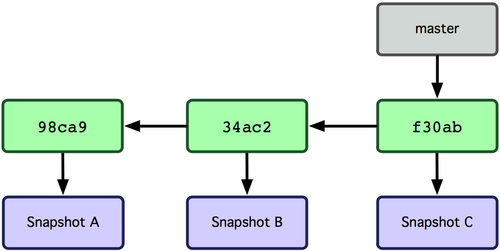
This is a schematic representation of three commits in a linear
workflow. The first commit 98ca9.. has no parents and Snapshot
A contains all the files and directory structure that was in
working tree when the project was started. Additional files
were added or changed and a new commit 34ac2.. was made containing
all the files and directories corresponding to the new state
of the working tree. This new commit 34ac2.. has one parent
98ca9.., which it points to. Continuing in this manner,
a new commit f30ab.. is made on top of the second commit
34ac2...
Again returning to our example, the initial commit might correspond to the
the original state of the directory tree. Then when you begin implementing
your new analysis method, you don’t need to make any copies of the previous
files (i.e., there is no need to execute cp analysis.py analysis.py.orig).
Since they are already committed, you can always access the original state of
the repository by checking out the original commit. To proceed you would
simply make the necessary edits to the files in your directory tree and then
when you are satisfied with your changes you make a new commit. This new
commit will correspond to a snapshot of the entire directory tree with all the
edits you’ve made to it since the original commit. To keep track of the
history of the project, the new commit will include a reference to the original
commit as its parent. Now when your advisor suggests the alternative analysis,
you could checkout the original commit, implement the new method, and commit
your changes including a reference to the original commit as its sole parent.
Finally, we need to understand how Git keeps track of commits. To reference a commit, Git uses a hash. Hashing provides a way to have a fixed-length identifier for a given set of information, such as a file or set of files. The identifier is not guaranteed to be unique, but under normal circumstances, it will always be unique.
To make this concrete, consider the following toy “implementation” in R:
library('digest')

# first commit
data1 <- 'This is the start of my paper.'
meta1 <- 'date: 8/20/15'
hash1 <- digest(c(data1, meta1), algo="sha1")

# second commit, linked to the first
data2 <- 'Some more text in my paper...'
meta2 <- 'date: 8/20/15'
# Note we add the parent hash here!
hash2 <- digest(c(data2, meta2, hash1), algo="sha1")
The first hash is a cryptographic signature of the content of the commit
(data1) and its metadata (meta1). Since this is the first commit to the
repository, there is no parent commit that proceeds it. However, the second
hash is a cryptographic signature of the content of the commit (data2) and
its metadata (meta2) and—importantly—the first hash (hash1).
And here it is in Python:
import sha

# first commit
data1 = 'This is the start of my paper.'
meta1 = 'date: 8/20/15'
hash1 = sha.sha(data1 + meta1).hexdigest()

# second commit, linked to the first
data2 = 'Some more text in my paper...'
meta2 = 'date: 8/20/15'
# Note we add the parent hash here!
hash2 = sha.sha(data2 + meta2 + hash1).hexdigest()
Now that we have developed some basic vocabulary, let’s start using Git. To begin, we will use Git in the simplest way possible—as a single-user working linearly with no remotes.
Note
If you haven’t done so already, you will want to configure Git before proceeding. You will want to do something like the following from your Bash shell:
$ git config --global user.name "Jarrod Millman"
$ git config --global user.email "millman@berkeley.edu"
$ git config --global core.editor /usr/bin/gedit
The first two lines tell Git who you are (obviously you should use
your own name and email address rather than mine). The final command
tells Git which text editor you wish to use. You should use whatever
text editor you prefer. For instance, I use /usr/bin/vim. The
most popular text editors on Linux are vim and emacs. If
you aren’t familiar with them at this point, you will probably
want to use a simple text editor like gedit, which should already
be installed on your BCE VM. You can learn
more about gedit here: https://help.ubuntu.com/community/gedit
Local, single-user, linear workflow
From a Bash shell, type git (or git help) to see a list of the ‘core’
commands, which will look something like this:
$ git
usage: git <command> [<args>]

The most commonly used git commands are:
   add        Add file contents to the index
   config     Get and set options
   clone      Clone a repository
   commit     Record changes to the repository
   init       Create an empty Git repository
   log        Show commit logs
   push       Update remote
   status     Show the working tree status
You will see more commands than this, but these are the ones we cover in the remainder of this tutorial.
There are two ways to get a repository. First you can clone an existing
repository. Second you can create a new one.
In this section, you will see how to create a new empty repository, add content, and commit your work to repository. You will also see how to look at a log of what you’ve done, see what you’ve changed, as well as delete and rename files.
git init: create an empty repository
First create an empty repository using the init command:
$ cd ~/src
$ git init demo
Note that I am working in my ~/src directory. It is common to use a
specific directory for all your local repositories. I tend to use src, but
you might use code, vc, work, or something similar.
Let’s look at what git did:
$ cd demo
$ ls -la
$ ls -l .git
The git init demo command should have created a new directory called
demo in your ~/src directory. Inside ~/src/demo you will see
another directory .git. The .git directory is where git stores the
repository. Every time you stage some work or commit it, a snapshot of
your working tree is stored in the .git directory. You should avoid
modifying this directory manually. Since all the repository information is
stored in the .git directory, you can turn your working tree back into
a normal directory tree by deleting the .git directory.
git add: add content to the staging area
Now let’s edit our first file in the test directory with a text editor. I’m doing it programmatically here for automation purposes, but you’d normally be editing by hand:
$ echo "My first bit of text" > file1.txt
Now we can tell git about this new file using the add command:
$ git add file1.txt
We can now ask git about what happened with status:
$ git status
You should now see that file1.txt has been added to the staging
area and is ready to be committed.
git commit: permanently record our changes in the repository
Now we are ready to commit our changes:
$ git commit -m "This is our first commit"
In the commit above, we used the -m flag to specify a message at the
command line. If we don’t do that, git will open the editor we specified
in our configuration above and require that we enter a message. By
default, git refuses to record changes that don’t have a message to go
along with them (though you can obviously ‘cheat’ by using an empty or
meaningless string: git only tries to facilitate best practices, it’s
not your nanny).
While many people use the -m flag routinely, I would recommend configuring
your editor and then using it to add your commit message. This has the
advantage that while you are writing your commit message, you can see the list
of files that you are committing. While this may seem inconsequential, I’ve
found that this practice is helpful and doesn’t slow me down.
git diff: what have I changed?
Let’s do a little bit more work. Again, in practice you’ll be editing the files by hand, here we do it via shell commands for the sake of automation (and therefore the reproducibility of this tutorial!)
$ echo "And now some more text..." >> file1.txt
And now we can ask git what is different:
$ git diff
The cycle of git: work, add, commit, ...
$ echo "Great progress ..." >> file1.txt
$ git add file1.txt
$ git commit -m "Great progress on this matter."
While the basic pattern is work, add, commit, and repeat, I tend to repeatedly add my work to the staging area before I finally commit it. This allows me to effectively keep saving my work, but only committing it once I have finished and tested a chunk of work. The importance of keeping track of your changes is not because you want to track the possibly circuitous route you happened to take while implementing a new feature in your code or revising your text. Rather, the goal is to track the logical and conceptual steps that led to your new feature or revision. As you learn more about git, you will learn how to rebase your changes on a new history, to rewrite your history, as well as how to break your commits into many commits. These features allow you to carefully construct the history of your changes into a comprehensible account that leads the reader of your history to an understanding of what you have done. This makes it easier for you to understand what you’ve done when you try to figure it out months later. It also makes it easier for your collaborators to understand what you’ve done.
Understanding the difference between the working tree, the staging area (or
index), and the repository can be confusing at first. The working tree or
working directory is your local directory on the filesystem. The staging area
(or index) reflects your git add, git rm, etc. changes that have been
staged but not committed. The repository reflects your commits.
Consider the schematic representation below. You work in your working
tree (or directory). Periodically, as you complete little chunks of work,
you add your work to the staging area. (Generally, speaking a
staging area is a place where you prepare to do something. For instance,
if you wish to go on a hike in the East Bay Regional Park system with
some of your friends, you could meet in a staging area—a parking lot
beside an entrance to one of the paths. The purpose of the staging area
in this instance is to provide a place where you and your friends can
coordinate before beginning your walk.) Once you’ve got a logical chunk
of work completed and staged, you can then commit it. Each commit has
a unique hash. You can go back to the exact snapshot of your working
tree at the time you committed it by checking it out using the git
checkout command, which we will discuss below.
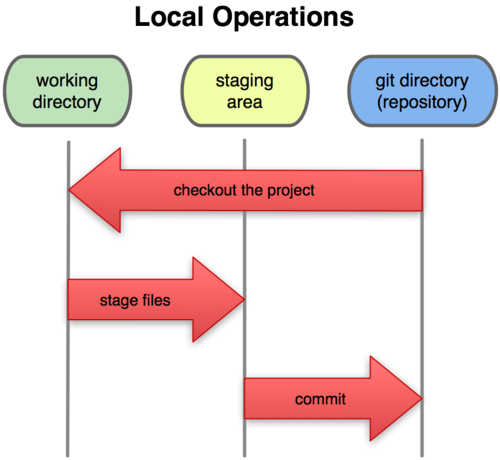
Working tree, staging area, and repository. Credit: ProGit book, by Scott Chacon, CC License.
git log revisited
First, let’s see what the log shows us now:
$ git log
Sometimes it’s handy to see a very summarized version of the log:
$ git log --oneline --topo-order --graph
Git supports aliases: new names given to command combinations. Let’s
make this handy shortlog an alias, so we only have to type git slog
and see this compact log:
# We create our alias (this saves it in git's permanent configuration file):
$ git config --global alias.slog "log --oneline --topo-order --graph"
# And now we can use it git slog
git mv and rm: moving and removing files
While git add is used to add files to the list git tracks, we must
also tell it if we want their names to change or for it to stop tracking
them. In familiar Unix fashion, the mv and rm git commands do
precisely this:
$ git mv file1.txt file-newname.txt
$ git status
Note that these changes must be committed too, to become permanent! In git’s world, until something hasn’t been committed, it isn’t permanently recorded anywhere:
$ git commit -m "I like this new name better"
$ git slog
And git rm works in a similar fashion.
Local, single-user, branching workflow
To understand what a Git branch is, we first need to revisit the idea of a
head. As discussed above, Git labels every commit with cryptographic
signature called a hash. These hashes can be considered to uniquely identify
every commit and are used to verify that the contents of the commit and history
of the commit are correct. While there are many advantages to using these
hashes to label the commits, it is unlikely that you will remember these
hashes. This is where heads come into play. A head is an easy to remember
label (e.g., HEAD, master, feature1) that references a commit.
By default every repository has a head called master. In this
figure master refers to the commit whose has begins
f30ab. This allows you to refer to the commit by the easy
to remember name master rather than f30ab.
A repository can contain any number of heads. At any point in time,
your current working tree will correspond to a specific commit.
By convention, we refer to this commit with the name HEAD (note
the use of all capital letters to distinguish this from the generic
notion of head).
In Git, the notions of branch and head are essentially identical. Each branch is associated with exactly one head and each head corresponds to one branch. However, we use the term head to refer exclusively to a label on exactly one commit; while the term branch may also sometimes be used to refer not only to the commit labeled by the head but that commit and all the commits that proceed it in the repository.
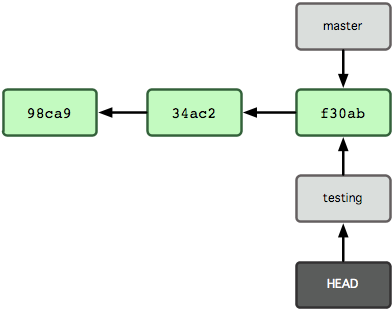
In this example there are two heads or branches, master and testing, and testing is the currently active branch since it’s what HEAD points to.
Once new commits are made on a branch, HEAD and the branch label move with the new commits:
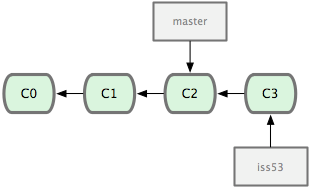
In this example (notice that HEAD is not shown), the branch master and iss53 share a common history up to commit C2. However, the branch iss53 differs from master as it has the additional commit C3.
This allows the history of both branches to diverge. For instance, your master branch may be were you integrate new features and bug fixes into the main trunk of development. If you have a bug report (perhaps labeled issue 53) that you are trying to fix, you might create a branch (labeled iss53). While you are preparing a fix for issue 53, the main trunk gains another bug fix or feature.
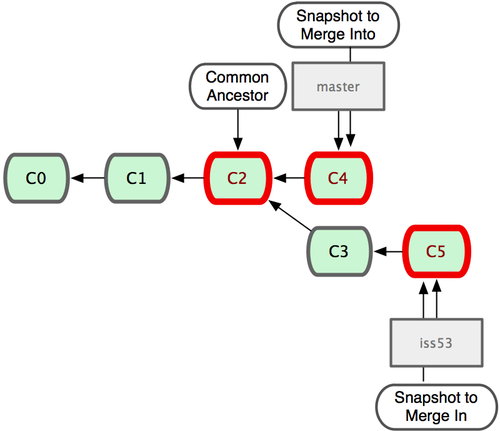
Here both master and iss53 have a shared history up to the commit C2. However they both have commits that the other lacks after their shared ancestor.
Once you’ve completed fixing issue 53 on branch iss53, you want to integrate your work back into the main trunk represented by the master branch. The process of integrating your work is called merging and often happens automatically. Once the iss53 branch has been merged back into the master branch, you can continue with a unified line of development:
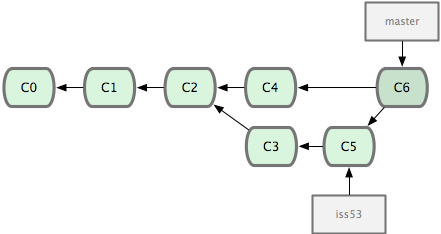
The result of merging the iss53 branch into the master branch. At this point, you could safely delete the iss53 branch, which would result in removing the label iss53 pointing to commit C5. Credit: ProGit book, by Scott Chacon, CC License.
Let’s now illustrate all of this with a concrete example. Let’s get our bearings first:
$ git status
$ ls
We are now going to try two different routes of development: on the
master branch we will add one file and on the experiment branch,
which we will create, we will add a different one. We will then merge
the experimental branch into master.
Create and work on an experimental branch:
$ git branch experiment
$ git checkout experiment
$ echo "Some crazy idea" > experiment.txt
$ git add experiment.txt
$ git commit -m "Trying something new"
$ git slog
Work on the master branch:
$ git checkout master
$ git slog
$ echo "Work goes on in master..." >> file-newname.txt
$ git add file-newname.txt
$ git commit -m "The mainline keeps moving"
$ git slog
Now merge experimental branch:
$ ls
$ git merge experiment
$ git slog
Note
We’ve seen that Git has multiple ways for referring to a commit.
- Using the full hash, which you can find using
git log - Using the first few characters of the hash (as long as there is no ambiguity)
- Using a head label (e.g.,
HEADormaster) - Relative to a specified commit (e.g.,
HEAD^is the parent of the current head commit)
Using remotes as a single user
We are now going to introduce the concept of a remote repository: a pointer to another copy of the repository that lives on a different location. This can be simply a different path on the filesystem or a server on the internet.
For this discussion, we’ll be using remotes hosted on the GitHub.com service, but you can equally use other services like BitBucket or Gitorious as well as host your own.
$ git remote -v
Since the above cell didn’t produce any output after the
git remote -v call, it means we have no remote repositories
configured. We will now proceed to do so.
Once logged into GitHub, go to
the new repository page and make a
repository called test. Do not check the box that says
Initialize this repository with a README, since we already have an
existing repository here. That option is useful when you’re starting
first at GitHub and don’t have a repository made already on a local computer.
We can now follow the instructions from the next page:
$ git remote add origin git@github.com:jarrodmillman/test.git
$ git push -u origin master
Let’s see the remote situation again:
$ git remote -v
We can now see this repository publicly on GitHub.
Let’s see how this can be useful for backup and syncing work between two different computers. I’ll simulate a 2nd computer by working in a different directory...
$ cd ~/src/
Here I clone my ‘test’ repository but with a different name, test2, to simulate a 2nd computer:
$ git clone git@github.com:jarrodmillman/test.git test2
$ cd test2
$ pwd
$ git remote -v
Let’s now make some changes in one ‘computer’ and synchronize them on the second.
First I switch directories to simulate working on computer #2:
$ cd ~/src/test2
$ echo "More new content on my experiment" >> experiment.txt
$ git add experiment.txt
$ git commit -m "More work, on machine #2"
Now we put this new work up on the GitHub server so it’s available from the internet:
$ git push
Now let’s fetch that work from machine #1. Again, I first change directories to simulate working from my other machine:
$ cd ~/src/demo
$ git pull
Conflict management
While git is very good at merging, if two different branches modify the same file in the same location, it simply can’t decide which change should prevail. At that point, human intervention is necessary to make the decision. Git will help you by marking the location in the file that has a problem, but it’s up to you to resolve the conflict. Let’s see how that works by intentionally creating a conflict.
We start by creating a branch and making a change to our experiment file:
$ git branch trouble
$ git checkout trouble
$ echo "This is going to be a problem..." >> experiment.txt
$ git add experiment.txt
$ git commit -m "Changes in the trouble branch"
And now we go back to the master branch, where we change the same file:
$ git checkout master
$ echo "More work on the master branch..." >> experiment.txt
$ git add experiment.txt
$ git commit -m "Mainline work"``
So now let’s see what happens if we try to merge the trouble branch
into master:
$ git merge trouble
Let’s see what git has put into our file:
$ cat experiment.txt
Some crazy idea
<<<<<<< HEAD
More work on the master branch...
=======
This is going to be a problem...
>>>>>>> trouble
At this point, we go into the file with a text editor, decide which
changes to keep, and make a new commit that records our decision. To
automate my edits, I use the sed command:
$ sed -i '/^</d' experiment.txt
$ sed -i '/^>/d' experiment.txt
$ sed -i '/^=/d' experiment.txt
I’ve now made the edits, in this case I decided that both pieces of text were useful, so I just accepted both additions:
$ cat experiment.txt
Some crazy idea
More work on the master branch...
This is going to be a problem..
Let’s then make our new commit:
$ git add experiment.txt
$ git commit -m "Completed merge of trouble, fixing conflicts along the way"
$ git slog
Note
While it’s a good idea to understand the basics of fixing merge conflicts by hand, in some cases you may find the use of an automated tool useful. Git supports multiple merge tools: a merge tool is a piece of software that conforms to a basic interface and knows how to merge two files into a new one. Since these are typically graphical tools, there are various to choose from for the different operating systems, and as long as they obey a basic command structure, git can work with any of them.
