Using the bash shell
Contents
Note
Some of the material in this tutorial was adapted from Chris Paciorek’s 2014 Statistics 243 lecture notes on Bash and his 2014 Statistics 243 lecture notes on using R.
Before reading this, you will want to be familiar with the material in the “Basics of UNIX” tutorial and screencast here: http://statistics.berkeley.edu/computing/training/tutorials
The Interactive Shell
The shell is an interactive computer programming environment. More specifically, it is a read-evaluate-print loop (REPL) environment. R and Python also provide REPL environments. A REPL reads a single expression or input, parses and evaluates it, prints the results, and then loops.
Note
I will use a $ prompt for bash, a > prompt for R, and a >>>
for Python, and a In [1]: prompt for IPython. By convention, a
regular user’s prompt in bash is $, while the root (or administrative)
user’s prompt is #. However, it is common practice to never log
on as the root user. If you need to run a command with root privileges,
you should use the sudo command (see the Getting started section
below for more details).
When you are working in a terminal window (i.e., a window with the command line interface), you’re interacting with a shell. There are multiple shells (e.g., sh, bash, csh, tcsh, zsh, fish). I’ll assume you are using bash, as this is the default for Mac OS X, the BCE VM, the SCF machines and most Linux distributions. However, the basic ideas are applicable to any Unix shell.
The shell is an amazingly powerful programming environment. From it you can interactively monitor and control almost any aspect of the OS and more importantly you can automate it. As you will see, bash has a very extensive set of capabilities intended to make both interactive as well as automated control simple, effective, and customizable.
Note
It can be difficult to distinguish what is shell-specific and what is just part of UNIX. Some of the material here is not bash-specific but general to UNIX.
Reference: Newham and Rosenblatt, Learning the bash Shell, 2nd ed.
Getting started
I assume you already have access to a basic bash shell on a computer with network access. You should also have ssh installed. SSH provides an encrypted mechanism to connect to a remote Unix terminal. To learn more about using ssh to connect to the SCF machines and general tips about using ssh on various operating systems, see: http://statistics.berkeley.edu/computing/ssh
To ssh to another machine, you need to know its (host)name. For example, to
ssh to scf-ug01.berkeley.edu, one of the SCF machines, you would:
$ ssh scf-ug01.berkeley.edu
Password:
At this point you have to type your password. Alternatively, you can set up ssh so that you can use it without typing your password. To learn how to set this up, see: http://statistics.berkeley.edu/computing/ssh-keys
If you have a different username on SCF machines, you will need to specify
it as well. For example, to specify the username jarrod, you would:
$ ssh jarrod@scf-ug01.berkeley.edu
If you want to view graphical applications on your local computer that are
running on the remote computer you need to use the -X option:
$ ssh -X jarrod@scf-ug01.berkeley.edu
Alternatively, if you want to copy a file (file1.txt) from your local
computer to scf-ug01.berkeley.edu, you can use the scp command,
which securely copies files between machines:
$ scp file1.txt jarrod@scf-ug01.berkeley.edu:.
The above command will copy file1.txt from my current working directory
on my local machine to jarrod‘s home directory on scf-ug01.berkeley.edu.
The . following the : indicates that I want to copy the file to
my home directory on the remote machine. I could also replace . with
any relative path from my home directory on the remote machine or I could
use an absolute path.
To copy a file (file2.txt) from scf-ug01.berkeley.edu to my local machine:
$ scp jarrod@scf-ug01.berkeley.edu:file2.txt .
I can even copy a file (file3.txt) owned by one user (jarrod) on one remote
machine scf-ug01.berkeley.edu to the account of another user (jmillman) on
another remote machine scf-ug02.berkeley.edu:
$ scp jarrod@scf-ug01.berkeley.edu:file3.txt jmillman@scf-ug01.berkeley.edu:.
If instead of copying a single file, I wanted to copy an entire directory
(src) from one machine to another, I would use the -r option:
$ scp -r src jmillman@scf-ug01.berkeley.edu:.
Regardless of whether you are working on a local computer or a remote one, it is occasionally useful to operate as a different user. For instance, you may need root (or administrative) access to change file permissions or install software.
To upgrade all the software on your BCE machine:
$ sudo apt-get upgrade
To install the text editor vim on a BCE machine:
$ sudo apt-get install vim
Tip
Most bash commands have electronic manual pages, which are accessible
directly from the commandline. You will be more efficient and effective
if you become accustomed to using these man pages. To view the man
page for the command sudo, for instance, you would type:
$ man sudo
Compare this output to the this sudo page.
Variables
Much of how bash behaves can be customized through the use of variables,
which consists of names that have values assigned to them. To access
the value currently assigned to a variable, you can prepend the name
with the dollar sign ($). To print the value you can use the echo
command.
- What is my default shell?
$ echo $SHELL - To change to bash on a one-time basis:
$ bash - To make it your default:
$ chsh /bin/bash
In the last example, /bin/bash should be whatever the path to the bash shell
is, which you can figure out using which bash.
To declare a variable, just assign a value to its reference.
For example, if you want to make a new variable with the name
counter with the value 1:
$ counter=1
Since bash uses spaces to parse the expression you give it as input, it is important to note the lack of spaces around the equal sign. Try typing the command with and without spaces and note what happens.
You can also enclose the variable name in curly brackets, which comes in handy when you’re embedding a variable within a line of code to make sure the shell knows where the variable name ends:
$ base=/home/jarrod/
$ echo $basesrc
$ echo ${base}src
Make sure you understand the difference in behavior in the last two lines.
There are also special shell variables called environment variables that help
to control the shell’s behavior. These are generally named in all caps. Type
printenv to see them. You can create your own environment variable as
follows:
$ export base=/home/jarrod/
The export command ensures that other shells created by the current shell
(for example, to run a program) will inherit the variable. Without the export
command, any shell variables that are set will only be modified within the
current shell. More generally, if you want a variable to always be accessible,
you should include the definition of the variable with an export command in
your .bashrc file.
You can control the appearance of the bash prompt using the PS1
variable:
$ echo $PS1
To modify it so that it puts the username, hostname, and current working directory in the prompt:
$ export PS1='[\u@\h \W]\$ '
[user1@local1 ~]$
Commands
While each command has its own syntax, there are some rules usually followed. Generally, a command line consists of 4 things: a command, command options, arguments, and line acceptance. Consider the following example:
$ ls -l file.txt
In the above example, ls is the command, -l is a command option
specifying to use the long format, file.txt is the argument, and the
line acceptance is indicated by hitting the Enter key at the end
of the line.
After you type a command at the bash prompt and indicate line acceptance with
the Enter key, bash parses the command and then attempts to execute the
command. To determine what to do, bash first checks whether the command is a
shell function (we will discuss functions below). If not, it checks to see
whether it is a builtin. Finally, if the command is not a shell function nor a
builtin, bash uses the PATH variable. The PATH variable is a list of
directories:
$ echo $PATH
/home/jarrod/usr/bin:/usr/local/bin:/bin:/usr/bin:
For example, consider the following command:
$ grep pdf file.txt
We will discuss grep later. For now, let’s ignore what grep actually does
and focus on what bash would do when you press enter after typing the above
command. First bash checks whether grep a shell function or a builtin.
Once it determines that grep is neither a shell function nor a builtin,
it will look for an executable file named grep first in /home/jarrod/usr/bin,
then in /usr/local/bin, and so on until it finds a match or runs out of places
to look. You can use which to find out where bash would find it:
$ which grep
/bin/grep
Exercise
Consider the following examples using the ls command:
$ ls --all -l
$ ls -a -l
$ ls -al
Use man ls to see what the command options do. Is there any difference
in what the three versions of the command invocation above return as
the result? What happens if you add a filename to the end of the command?
Tab completion
When working in the shell, it is often unnecessary to type out an entire command or file name, because of a feature known as tab completion. When you are entering a command or filename in the shell, you can, at any time, hit the tab key, and the shell will try to figure out how to complete the name of the command or filename you are typing. If there is only one command in the search path and you’re using tab completion with the first token of a line, then the shell will display its value and the cursor will be one space past the completed name. If there are multiple commands that match the partial name, the shell will display as much as it can. In this case, hitting tab twice will display a list of choices, and redisplay the partial command line for further editing. Similar behavior with regard to filenames occurs when tab completion is used on anything other than the first token of a command.
Note
Note that R does tab completion for objects (including functions) and filenames. While the default Python shell does not perform tab completion, the IPython shell does.
Command History and Editing
By using the up and down arrows, you can scroll through commands that you have entered previously. So if you want to rerun the same command, or fix a typo in a command you entered, just scroll up to it and hit enter to run it or edit the line and then hit enter.
To list the history of the commands you entered, use the history command:
$ history
  1    echo $PS1
  2    PS1=$
  3    bash
  4    export PS1=$
  5    bash
  6    echo $PATH
  7    which echo
  8    ls --all -l
  9    ls -a -l
  10   ls -al
  11   ls -al manual.xml
The behavior of the history command is controlled by a shell variables:
$ echo $HISTFILE
$ echo $HISTSIZE
You can also rerun previous commands as follows:
$ !-n
$ !gi
The first example runs the nth previous command and the second one runs the last command that started with ‘gi’.
Table. Command History Expansion
| Designator | Description |
|---|---|
!! |
Last command |
!n |
Command numbered n in the history |
!-n |
Command n previous |
!string |
Last command starting with string |
!?string |
Last command containing string |
^string1^string2 |
Execute the previous command with string2 substituted for string1 |
If you’re not sure what command you’re going to recall, you can append
:p at the end of the text you type to do the recall, and the result
will be printed, but not executed. For example:
$ !gi:p
You can then use the up arrow key to bring back that statement for editing or execution.
You can also search for commands by doing Ctrl-r and typing a string of
characters to search for in the search history. You can hit return to submit,
Ctrl-c to get out, or ESC to put the result on the regular command line
for editing.
Command Substitution
You may occasionally need to substitute the results of a command for use by
another command. For example, if you wanted to use the directory listing
returned by ls as the argument to another command, you would type
$(ls) in the location you want the result of ls to appear.
An older notation for command substitution is to use backticks (e.g., `ls`
versus $(ls)). It is generally preferable to use the new notation, since
there are many annoyances with the backtick notation. For example, backslashes
(\) inside of backticks behave in a non-intuitive way, nested quoting is
more cumbersome inside backticks, nested substitution is more difficult inside
of backticks, and it is easy to visually mistake backticks for a single quote.
Exercise
Try the following commands:
$ ls -l tr
$ which tr
$ ls -l which tr
$ ls -l $(which tr)
Make sure you understand why each command behaves as it does.
Shortcuts
Aliases – command shortcuts
Aliases allow you to use an abbreviation for a command, to create new
functionality or to insure that certain options are always used when you
call an existing command. For example, I’m lazy and would rather type
q instead of exit to terminate a shell window. You could create
the alias as follow:
$ alias q=exit
As another example, suppose you find the -F option of ls (which
displays / after directories, \ after executable files
and @ after links) to be very useful. The command
$ alias ls="ls -F"
will insure that the -F option will be used whenever you use ls.
If you need to use the unaliased version of something for which you’ve
created an alias, precede the name with a backslash (\). For
example, to use the normal version of ls after you’ve created the
alias described above:
$ \ls
The real power of aliases is only achieved when they are automatically
set up whenever you log in to the computer or open a new shell window.
To achieve that goal with aliases (or any other bash shell commands),
simply insert the commands in the file .bashrc in your home directory.
For example, here is an excerpt from my .bashrc:
# .bashrc

# Source global definitions
if [ -f /etc/bashrc ]; then
        . /etc/bashrc
fi

# User specific aliases and functions
pushdp () {
 pushd "$(python -c "import os.path as _, ${1}; \
   print _.dirname(_.realpath(${1}.__file__[:-1]))"
 )"
}

export EDITOR=vim
source /usr/share/git-core/contrib/completion/git-prompt.sh
export PS1='[\u@\h \W$(__git_ps1 " (%s)")]\$ '

# history settings
export HISTCONTROL=ignoredups   # no duplicate entries
shopt -s histappend             # append, don't overwrite

# R settings
export R_LIBS=$HOME/usr/lib64/R/library
alias R="/usr/bin/R --quiet --no-save"

# Set path
mybin=$HOME/usr/bin
export PATH=$mybin:$HOME/.local/bin:$HOME/usr/local/bin:$PATH:
export LD_LIBRARY_PATH=$LD_LIBRARY_PATH:$HOME/usr/local/lib

# Additional aliases
alias grep='grep --color=auto'
alias hgrep='history | grep'
alias l.='ls -d .* --color=auto'
alias ll='ls -l --color=auto'
alias ls='ls --color=auto'
alias more=less
alias vi=vim
alias which='(alias; declare -f) | /usr/bin/which --tty-only \
         --read-alias --read-functions --show-tilde --show-dot'
Exercise
Look over the content of the example .bashrc and make sure you understand
what each line does. For instance, use man grep to see what the option
--color=auto does. Use man which to figure out what the various
options passed to it do.
Keyboard shortcuts
Note that you can use emacs-like control sequences (Ctrl-a, Ctrl-e,
Ctrl-k) to navigate and delete characters.
Table. Keyboard Shortcuts
| Key Strokes | Descriptions |
|---|---|
Ctrl-a |
Beginning of line |
Ctrl-e |
End of file |
Ctrl-k |
Delete line from cursor forward |
Ctrl-d |
EOF; exit |
Ctrl-c |
Interrupt current command |
Ctrl-z |
Suspend current command |
Ctrl-l |
Clear screen |
Basic File Management
In Unix, almost “everything is a file.” This means that a very wide variety of input and output resources (e.g., documents, directories, keyboards, harddrives, network devices) are streams of bytes available through the filesystem interface. This means that the basic file management tools are extremely powerful in Unix. Not only can you use these tools to work with files, but you can also use them to monitor and control many aspects of your computer.
Files
A file typically consist of these attributes:
- Name.
- Type.
- Location.
- Size.
- Protection.
- Time, date, and user identification.
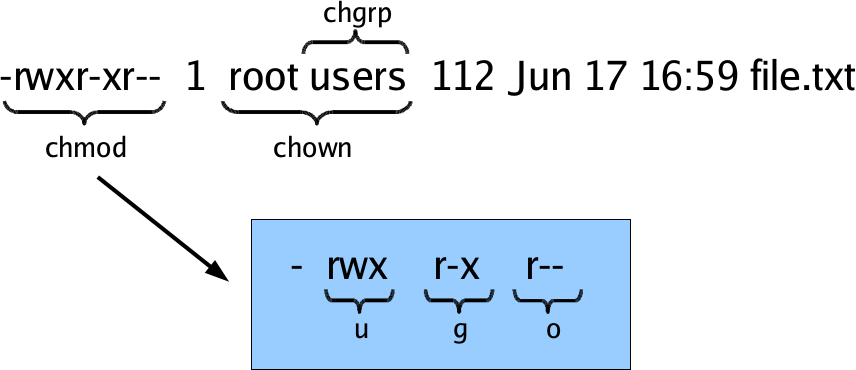
Schematic of file attributes.
Listing file attributes with ls:
$ ls -l
Getting more information with stat:
$ stat manual.xml
Finding out what type of file you have:
$ file manual.xml
Tip
The file command relies on many sources
of information to determine what a file contains. The easiest part
to explain is magic. Specifically, the file command examines
the content of the file and compares it with information found in
the /usr/share/magic/ directory.
Changing file attributes with chmod:
$ chmod g+w manual.xml
For more detailed information, please see the “Basics of UNIX” tutorial and screencast here: http://statistics.berkeley.edu/computing/training/tutorials
Filename Globbing
Shell file globbing will expand certain special characters (called wildcards) to match patterns of filenames, before passing those filenames on to a program. Note that the programs themselves don’t know anything about wildcards; it is the shell that does the expansion, so that programs don’t see the wildcards. The following table shows some of the special characters that the shell uses for expansion.
Table. Filename wildcards
| Wildcard | Function |
|---|---|
* |
Match zero or more characters. |
? |
Match exactly one character. |
[characters] |
Match any single character from among characters listed between brackets. |
[!characters] |
Match any single character other than characters listed between brackets. |
[a-z] |
Match any single character from among the range of characters listed between brackets. |
[!a-z] |
Match any single character from among the characters not in the range listed between brackets |
{frag1,frag2,...} |
Brace expansion: create strings frag1, frag2, etc. |
List all files ending with a digit:
$ ls *[0-9]
Make a copy of filename as filename.old:
$ cp filename{,.old}
Remove all files beginning with a or z:
$ rm [az]*
List all the R code files with a variety of suffixes:
$ ls *.{r,q,R}
The echo command can be used to verify that a wildcard expansion will
do what you think it will:
$ echo cp filename{,.old}
cp filename filename.old
If you want to suppress the special meaning of a wildcard in a shell command,
precede it with a backslash (\). Note that this is a general rule of thumb
in many similar situations when a character has a special meaning but you just
want to treat it as a character.
To read more about standard globbing patterns, see the man page:
$ man 7 glob
Exercise
Brace expansion is quite useful and more flexible than I’ve indicated.
Above we saw how to use brace expansion using a comma comma separated
list of items inside the curly braces (e.g., {r,q,R}), but they
can also be used with a sequence specification. A sequence is indicated
with a start and end item separated by two periods (..). Try typing
the following examples at the command line and try to figure out how they
work:
$ echo {1..15}
$ echo {a{1..3},b{1..5},c{c..e}}
$ echo {{d..a},{a..d}}
$ echo {{d..b},a,{b..d}}
$ echo {1..5..2}
$ echo {z..a..-2}
Quoting
Table. Quotes
| Types of Quoting | Description |
|---|---|
' ' |
hard quote - no substitution allowed |
" " |
soft quote - allow substitution |
Finally, a note about using single vs. double quotes in shell code. In general, variables inside double quotes will be evaluated, but variables not inside double quotes will not be:
$ echo "$HOME"
/home/jarrod
$ echo '$HOME'
$HOME
This can be useful, for example, when you have a directory with a space in its name (of course, it is better to avoid spaces in file and directory names). Since bash uses spaces to parse the elements of the command line, you might try escaping the spaces with a backslash:
$ ls $HOME/with\ space
ls: cannot access /home/jarrod/with space: No such file or directory
You could fix this error by using triple backslashes, but a cleaner approach is to use soft (or double) quotes:
$ ls "$HOME/with\ space"
file1.txt
If you used hard quotes, you will get this error:
$ ls '$HOME/with\ space'
ls: cannot access $HOME/with\ space: No such file or directory
What if you have double quotes in your file or directory name (again, it is better to avoid using double quotes in file and directory names)? In this case, you will need to escape the quote:
$ ls "$HOME/\"with\"quote"
So we’ll generally use double quotes. We can always work with a literal double quote by escaping it as seen above.
Basic utilities
Since files are such an essential aspect of Unix and working from the shell is the primary way to work with Unix, there are a large number of useful commands and tools to view and manipulate files.
- cat – concatenate files and print on the standard output
- cp– copy files and directories
- cut – remove sections from each line of files
- diff– find differences between two files
- grep – print lines matching a pattern
- head – output the first part of files
- find – search for files in a directory hierarchy
- less – opposite of more
- more – file perusal filter for crt viewing
- mv – move (rename) files
- nl – number lines of files
- paste – merge lines of files
- rm – remove files or directories
- rmdir – remove empty directories
- sort – sort lines of text files.
- split – split a file into pieces
- tac – concatenate and print files in reverse
- tail – output the last part of files
- touch – change file timestamps
- tr – translate or delete characters
- uniq – remove duplicate lines from a sorted file
- wc – print the number of bytes, words, and lines in files
- wget and
curl– non-interactive network downloader
As we’ve already seen the general syntax for a Unix program is:
$ command -options argument1 argument2 ...
For example,
$ grep -i graphics file.txt
looks for the literal string graphics (argument 1) in file.txt
(argument2) with the option -i, which says to ignore the case of the
letters. While
$ less file.txt
simply pages through a text file (you can navigate up and down) so you
can get a feel for what’s in it. To exit less type q.
To find files by name, modification time, and type:
$ find . -name '*.txt'  # find files named *.txt
$ find . -mtime -2      # find files modified less than 2 days ago
$ find . -type l        # find links
Unix programs often take options that are identified with a minus
followed by a letter, followed by the specific option (adding a space
before the specific option is fine). Options may also involve two
dashes, e.g., R --no-save. A standard two dash option for many commands
is --help. For example, try:
$ tail --help
Here are a couple of examples of using the tail command:
$ wget http://jarrodmillman.com/rcsds/data/cpds.csv
$ tail -n 10 cpds.csv   # last 10 lines of cpds.csv
$ tail -f cpds.csv      # shows end of file, continually refreshing
The first line downloads the data from my website. The two main tools for
downloading network accessible data from the commandline are wget and
curl. I tend to use wget as my commandline downloading tool as it
is more convenient.
A few more tidbits about grep (we will see more examples of grep in the
section on regular expressions, but it is so useful that it is worth seeing
many times):
$ grep ^2001 cpds.csv   # returns lines that start with '2001'
$ grep 0$ cpds.csv      # returns lines that end with '0'
$ grep 19.0 cpds.csv    # returns lines with '19' separated from '0' by a single character
$ grep 19.*0 cpds.csv   # now separated by any number of characters
$ grep -o 19.0 cpds.csv # returns only the content matching the pattern from the relevant lines
Note that the first argument to grep is the pattern you are looking for. The syntax is different from that used for wildcards in file names. Also, you can use regular expressions in the pattern. We won’t see this in detail here, but will discuss this in the section below on regular expressions.
It is sometimes helpful to put the pattern inside double quotes, e.g., if you want spaces in your pattern:
$ grep "George .* Bush" cpds.csv
More generally in Unix, enclosing a string in quotes is often useful to indicate that it is a single argument/value.
If you want to explicitly look for one of the special characters used in
creating patterns (such as double quote ("), period (.), etc., you
can “escape” them by preceding with a back-slash. For example to look
for "Canada", including the quotes:
$ grep "\"Canada\"" cpds.csv
If you have a big data file and need to subset it by line (e.g., with
grep) or by field (e.g., with cut), then you can do it really fast
from the Unix command line, rather than reading it with R, SAS, Python,
etc.
Much of the power of these utilities comes in piping between them (see the next section) and using wildcards (see the section on Globbing) to operate on groups of files. The utilities can also be used in shell scripts to do more complicated things.
We will look at several examples of how to use these utilities below, but first let’s discuss streams and redirection.
Exercise
You’ve already seen some of the above commands. Follow the links above and while you are reading the abbreviated man pages consider how you might use these commands.
Streams, Pipes, and Redirects
Unix programs that involve input and/or output often operate by reading input from a stream known as standard input (stdin), and writing their results to a stream known as standard output (stdout). In addition, a third stream known as standard error (stderr) receives error messages and other information that’s not part of the program’s results. In the usual interactive session, standard output and standard error default to your screen, and standard input defaults to your keyboard.
You can change the place from which programs read and write through redirection. The shell provides this service, not the individual programs, so redirection will work for all programs. The following table shows some examples of redirection.
Table. Common Redirection Operators
| Redirection Syntax | Function |
|---|---|
$ cmd > file |
Send stdout to file |
$ cmd 1> file |
Same as above |
$ cmd 2> file |
Send stderr to file |
$ cmd > file 2>&1 |
Send both stdout and stderr to file |
$ cmd < file |
Receive stdin from file |
$ cmd >> file |
Append stdout to file: |
$ cmd 1>> file |
Same as above |
$ cmd 2>> file |
Append stderr to file |
$ cmd >> file 2>&1 |
Append both stdout and stderr to file |
$ cmd1 | cmd2 |
Pipe stdout from cmd1 to cmd2 |
$ cmd1 2>&1 | cmd2 |
Pipe stdout and stderr from cmd1 to cmd2 |
$ cmd1 tee file1 | cmd2 |
Pipe stdout and cmd1 to cmd2 while simultaneously writing it to file1 using tee |
Note that cmd may include options and arguments as seen in the previous
section.
Standard Redirection
Operations where output from one command is used as input to another command
(via the | operator) are known as pipes; they are made especially useful by
the convention that many UNIX commands will accept their input through the
standard input stream when no file name is provided to them.
A simple pipe to wc to count the number of words in a string:
$ echo "hey there" | wc -w
2
Translating lowercase to UPPERCASE with tr:
$ echo 'user1'  | tr 'a-z' 'A-Z'
USER1
Here’s an example of finding out how many unique entries there are in the 2nd column of a data file whose fields are separated by commas:
$ cut -d',' -f2 cpds.csv | sort | uniq | wc
$ cut -d',' -f2 cpds.csv | sort | uniq > countries.txt
Above we use the cut utility to extract the second field (-f2) or
column of the file cpds.csv where the fields (or columns) are split or
delimited by a comma (-d','). The standard output of the cut command is
then piped (via |) to the standard input of the sort command. Then the
output of sort is sent to the input of uniq to remove duplicate entries
in the sorted list provided by sort. Rather than using sort | uniq, you
could also use sort -u. Finally, the first of the cut commands prints
a word count summary using wc; while the second saving the sorted
information with duplicates removed in the file countries.txt.
To see if there are any “S” values in certain fields (fixed width) of a set of files (note I did this on 22,000 files (5 Gb or so) in about 5 minutes on my desktop; it would have taken much more time to read the data into R):
$ cut -b29,37,45,53,61,69,77,85,93,101,109,117,125,133,141,149, \
        157,165,173,181,189,197,205,213,221,229,237,245,253, \
        261,269 USC*.dly | grep S | less
A closely related, but subtly different, capability that we saw above is
command substitution. Recall that when the shell encounters a command
surrounded by $() (or backticks), it runs the command and replaces the
expression with the output from the command; this allows something
similar to a pipe, but is appropriate when a command reads its arguments
directly from the command line instead of through standard input. For example,
suppose we are interested in searching for the text pdf in the last 4 R code
files (those with suffix .r or .R) that were modified in the current
directory. We can find the names of the last 4 files ending in .R or .r
which were modified using:
$ ls -t *.{R,r} | head -4
and we can search for the required pattern using grep (we will discuss
grep again in the section on regular expressions). Putting these
together with the backtick operator we can solve the problem using:
$ grep pdf $(ls -t *.{R,r} | head -4)
Note that piping the output of the ls command into grep would not
achieve the desired goal, since grep reads its filenames from the
command line, not standard input.
The xargs and tee commands
You can also redirect output as the arguments to another program using
the xargs utility. Here’s an example:
$ ls -t *.{R,r} | head -4 | xargs grep pdf
The tee command let’s you create 2 streams from 1. For example, consider
the case where you want the results of this command:
$ cut -d',' -f2 cpds.csv | sort | uniq
to both be output to the terminal screen you are working in as well as being saved to a file. You could issue the command twice:
$ cut -d',' -f2 cpds.csv | sort | uniq
$ cut -d',' -f2 cpds.csv | sort | uniq > countries.txt
Instead of repeating the command and wasting computing time, you could use
tee command:
$ cut -d',' -f2 cpds.csv | sort | uniq | tee countries.txt
Regular Expressions
Regular expressions (regex) are a domain-specific language for finding patterns
and are one of the key functionalities in scripting languages such as Perl and
Python, as well as the UNIX utilities sed, awk, and grep as we will
see below. I’ll just cover the basic use of regular expressions in bash, but
once you know that, it would be easy to use them elsewhere (Python, R, etc.).
At the level we’ll consider them, the syntax is quite similar.
Note
POSIX.2 regular expressions come in two flavors: extended regular expressions
and basic (or obsolete) regular expressions. The extended syntax has metacharacters
() and {}, while the basic syntax requires the metacharacters have
to be designated \(\) and \{\}. In addition to the POSIX standard,
Perl regular expressions are also widely used. While we won’t go into
detail, we will see some examples of each syntax.
Overview and core syntax
The basic idea of regular expressions is that they allow us to find matches of strings or patterns in strings, as well as do substitution. Regular expressions are good for tasks such as:
- extracting pieces of text - for example finding all the links in an html document;
- creating variables from information found in text;
- cleaning and transforming text into a uniform format;
- mining text by treating documents as data; and
- scraping the web for data.
Regular expressions are constructed from three things:
- Literal characters are matched only by the characters themselves,
- Character classes are matched by any single member in the class, and
- Modifiers operate on either of the above or combinations of them.
Note that the syntax is very concise, so it’s helpful to break down individual regular expressions into the component parts to understand them. Since regex are their own language, it’s a good idea to build up a regex in pieces as a way of avoiding errors just as we would with any computer code. It is also helpful to search for common regex online before trying to craft your own. For instance, if you wanted to use a regex that matches valid email addresses, you would need to match anything that complies with the RFC 822 grammar. If you look over that document, you will quickly realize that implementing a correct regular expression to validate email addresses is extremely complex. So if you are writing a website that validates email addresses, it is best to look for a bug-vetted implementation rather than creating your own.
The special characters (meta-characters) used for defining regular expressions are:
* . ^ $ + ? ( ) [ ] { } | \
To use these characters literally as characters, we have to ‘escape’ them. In
bash, you escape these characters by placing a single backslash before the
character you want to escape. In R, we have to use two backslashes instead of
a single backslash because R uses a single backslash to symbolize certain
control characters, such as \n for newline.
Character sets and character classes
Character sets
| Operators | Description |
|---|---|
[abc] |
Match any single character from from the listed characters |
[a-z] |
Match any single character from the range of characters |
[^abc] |
Match any single character not among listed characters |
[^a-z] |
Match any single character not among listed range of characters |
. |
Match any single character except a newline |
\ |
Turn off (escape) the special meaning of a metacharacter |
If we want to search for any one of a set of characters, we use a
character set, such as [13579] or [abcd] or [0-9] (where the
dash indicates a sequence) or [0-9a-z]. To indicate any
character not in a set, we place a ^ just inside the first bracket:
[^abcd].
There are a bunch of named character classes so that we don’t have write out
common sets of characters. The syntax is [:CLASS:] where CLASS is one of
the following values:
"alnum", "alpha", "ascii", "blank", "cntrl", "digit", "graph",
"lower", "print", "punct", "space", "upper", "word" or "xdigit".
To learn more about regular expressions, you can type:
$ man 7 regex
To make a character set with a character class you
need two square brackets, e.g. the digit class: [[:digit:]]. Or we
can make a combined character set such as [[:alnum:]_].
Location-specific matches
Position anchors
| Operators | Description |
|---|---|
^ |
Match the beginning of a line. |
$ |
Match the end of a line. |
To find a pattern at the beginning of the string, we use ^ (note this was
also used for negation, but in that case occurs only inside square brackets)
and to find it at the end we use $.
Repetitions, Grouping, and References
Now suppose I wanted to be able to detect phone numbers, email addresses, etc. I often need to be able to deal with repetitions of character sets.
Modifiers
| Operators | Description |
|---|---|
* |
Match zero or more of the character that precedes it. |
? |
Match zero or one instance of the preceding regex. |
+ |
Match one or more instances of the preceding regex. |
{n,m} |
Match a range of occurrences of the single character or regex that precedes this construct. |
| |
Match the character or expression to the left or right of the vertical bar. |
I can indicate repetitions as indicated in these examples:
[[:digit:]]*– any number of digits (zero or more)[[:digit:]]+– at least one digit[[:digit:]]?– zero or one digits[[:digit:]]{1,3}– at least one and no more than three digits[[:digit:]]{2,}– two or more digits
An example is that \[.*\] is the pattern of closed square brackets
with any number of characters (.*) inside.
We often want to be able to look for multi-character patterns. For example,
if you wanted to match phone numbers whether they start with 1- or not
you could use the following:
(1-)?[[:digit:]]{3}-[[:digit:]]{4}
The first part of the pattern (1-)? matches 0 or 1 occurrences of 1-.
Then the pattern [[:digit:]]{3} matches any 3 digits. Similarly, the
pattern [[:digit:]]{4} matches any 4 digits. So the whole pattern
matches any three digits followed by - and then followed by four
digits when it is preceded by 0 or 1 occurrences of 1-.
Parentheses are also used with a pipe (|) to indicate any one of a set of
multi-character sequences, such as (http|ftp).
Greedy matching
Regular expression pattern matching is greedy—by default, the longest matching string is chosen.
Suppose we have the following file:
$ cat file1.txt
Do an internship <b> in place </b> of <b> one </b> course.
If we want to match the html tags (e.g., <b> and </b>, we might
be tempted to use the pattern <.*>. Using the -o option to grep,
we can have grep print out just the part of the text that the pattern
matches:
$ grep -o "<.*>" file1.txt
<b> in place </b> of <b> one </b>
To get a non-greedy match, you can use the modifier ? after the
quantifier. However, this requires that we use the Perl syntax. In order for
grep to use the Perl syntax, we need to use the -P option:
$ grep -P -o "<.*?>" file1.txt
<b>
</b>
<b>
</b>
However, one can often avoid greedy matching by being more clever.
Challenge: How could we change our regexp to avoid the greedy
matching without using the ? modifier? Hint: Is there some
character set that we don’t want to be inside the angle brackets?
Tip
Globs vs. Regex:
Be sure you understand the difference between filename globbing (see
the Section called Filename Globbing) and regular expressions.
Filename globbing only works for filenames, while regular expressions
are used to match patterns in text more generally. While they both
use the same set of symbols, they mean different things (e.g., *
matches 0 or more characters when globbing but matches 0 or more
repetitions of the character that precedes it when used in a regular
expression).
ed, grep, sed, awk, and perl
Before the text editor, there was the line editor. Rather than presenting you
with the entire text as a text editor does, a line editor only displays lines
of text when it is requested to. The original Unix line editor is called ed.
You will likely never use ed directly, but you will very likely use commands
that are its descendants. For example, the commands grep, sed, awk,
and vim are all based directly on ed (e.g., grep is a ed command
that is now available as a standalone command, while sed is a streaming
version of ed) or inherit much of its syntax (e.g., awk and vim
both heavily borrow from the ed syntax). Since ed was written when
computing resources were very constrained compared to today, this means that
the syntax of these commands can be terse. However, it also means that learning
the syntax for one of these tools will be rewarded when you need to learn the
syntax of another of these tools.
grep
The simplest of these tools is grep. As I mentioned, ed only displays
lines of text when requested. One common task was to print all the lines in
a file matching a specific regular expression. The command in ed that
does this is g/<re>/p, which stands for globally match all lines containing
the regular express <re> and print them out.
To start you will need to create a file called file1.txt with the following
content:
This is the first line.
Followed by a this line.
And then ...
To print all the lines containing is:
$ grep is file1.txt
This is the first line.
Followed by a this line.
To print all the lines not containing is:
$ grep -v is file1.txt
And then ...
Now let’s consider a file named file2.txt with the following
content:
Here's my number: 919-543-3300.
hi John, good to meet you
They bought 731 bananas
Please call 1.919.554.3800
I think he said it was 337.4355
Let’s use the pattern from the section above to print all lines containing phone numbers:
$ grep '(1-)?[[:digit:]]{3}-[[:digit:]]{4}' file2.txt
You will notice that this doesn’t match any lines. The reason is that the
group syntax (1-) and the {} notation are not part of the extended
syntax. To have grep use the extended syntax, you can either use the
-E option:
$ grep -E '(1-)?[[:digit:]]{3}-[[:digit:]]{4}' t.t
Here's my number: 919-543-3300.
or use the egrep command:
$ egrep  '(1-)?[[:digit:]]{3}-[[:digit:]]{4}' t.t
Here's my number: 919-543-3300.
If we want to match regardless of whether the phone number is separated
by a minus - or a period ., we could use the pattern [-.]:
$ egrep  '(1[-.])?[[:digit:]]{3}[-.][[:digit:]]{4}' file2.txt
Here's my number: 919-543-3300.
Please call 1.919.554.3800
I think he said it was 337.4355
Exercise
Explain what the following regular expression matches:
$ grep '^[^T]*is.*$' file1.txt
sed and awk
Printing lines of text with sed:
$ sed -n '1,9p' file.txt       # prints out lines 1-9 of file.txt
$ sed -n '/^#/p' file.txt       # prints out lines starting with # of file.txt
The first command prints out lines 1-9 of file.txt, while the second one
prints out lines starting with # of file.txt.
Deleting lines of text with sed:
$ sed -e '1,9d' file.txt
$ sed -e '/^;/d' -e '/^$/d' file.txt
The first line deletes lines 1-9 of file.txt. What do you think the second
line does?
Text substitution with sed:
$ sed 's/old_pattern/new_pattern/' file.txt > new_file.txt
$ sed 's/old_pattern/new_pattern/g' file.txt > new_file.txt
The first line replaces only 1st instance in a line, while the second line replaces all instances in a line (i.e., globally).
Awk is a general purpose programming language typically used in data extraction tasks and particularly well-suited to one-liners (although it is possible to write long programs in it, it is rare). For our purposes, we will just look at a few common one-liners to get a sense of how it works. Basically, awk will go through a file line by line and perform some action for each line.
For example to double space a file, you would read each line, print it, and then print a blank line:
$ awk '{ print } { print "" }' file.txt
Print every line of a file that is longer than 80 characters:
$ awk 'length($0) > 80' file.txt
Print the home directory of every user defined in the file /etc/passwd:
$ awk -F: '{ print $6 }' /etc/passwd
To see what this did, let’s look at the first line of /etc/passwd:
$ head -n 1 /etc/passwd
root:x:0:0:root:/root:/bin/bash
As you can see the entries are separated by colons (:) and the fifth
field contains the root user’s home directory (/root). The option
-F: specifies that the colon : is the field delimiter and print $6
prints the 6th field of each line.
You don’t need to know much sed or awk, but it is good to know about
them since you can search the internet for awk or sed one-liners. If you have
some file munging task, it can be helpful to do a quick search before writing
code to perform the task yourself.
perl
Perl is another general-purpose programming language that is particular useful for one-liner commands to perform data extraction and manipulation tasks. Again even if you don’t learn how to program in Perl, it can be useful to have a couple one-liners in your toolbox.
Text substitution with perl:
$ perl -pi -e 's/old_pattern/new_pattern/g' file.txt
$ perl -pi -e 's/old_pattern/new_pattern/g' $(find . -name \*.html)
The i option tells perl to do the global substitution in place.
You can also substitute the / with another character. For
example:
$ perl -pi -e 's:old_pattern:new_pattern:g' file.txt
Summing columns with perl:
$ perl -lane 'print $F[0] + $F[1]' file.txt
This will sum columns 1 and 2 of file.txt.
Processes
A process is a program that is being executed. Processes have the following attributes:
- A lifetime.
- A process ID (PID).
- A user ID (UID).
- A group ID (GID).
- A parent process.
- An environment.
- A current working directory.
Monitoring
Examining subprocesses of your shell with ps:
$ ps
PID TTY          TIME CMD
19370 pts/3    00:00:00 bash
22846 pts/3    00:00:00 ps
Examining in more detail subprocesses of your shell with ps:
$ ps -f
UID        PID  PPID  C STIME TTY          TIME CMD
jarrod   19370 19368  0 10:51 pts/3    00:00:00 bash
jarrod   22850 19370  0 14:57 pts/3    00:00:00 ps -f
Examining in more detail all processes on your computer:
$ ps -ef
UID        PID  PPID  C STIME TTY          TIME CMD
root         1     0  0 Aug21 ?        00:00:05 /usr/lib/systemd
root         2     0  0 Aug21 ?        00:00:00 [kthreadd]
root         3     2  0 Aug21 ?        00:00:07 [ksoftirqd/0]
root         5     2  0 Aug21 ?        00:00:00 [kworker/0:0H]
   <snip>
root     16210     1  0 07:19 ?        00:00:00 login -- jarrod
jarrod   16219 16210  0 07:19 tty1     00:00:00 -bash
jarrod   16361 16219  0 07:19 tty1     00:00:00 /bin/sh /bin/startx
   <snip>
You can use the -u option to see percent CPU and percent memory
used by each process. You can use the -o option to provide
your own user-defined format; for example,
$ ps -o pid,ni,pcpu,pmem,user,comm
  PID  NI %CPU %MEM USER     COMMAND
18124   0  0.0  0.0 jarrod   bash
22963   0  0.0  0.0 jarrod   ps
To see the hierarchical process structure, you can use the pstree command.
Examining processes with top:
$ top
top - 13:49:07 up  1:49,  3 users,  load average: 0.10, 0.15, 0.18
Tasks: 160 total,   1 running, 158 sleeping,   1 stopped,   0 zombie
%Cpu(s):  2.5 us, 0.5 sy, 0.0 ni, 96.9 id, 0.0 wa, 0.0 hi, 0.0 si, 0.0 st
KiB Mem : 7893644 total, 5951552 free, 1085584 used,  856508 buff/cache
KiB Swap: 7897084 total, 7897084 free,       0 used. 6561548 avail Mem

  PID USER     PR  NI    VIRT    RES    SHR S  %CPU %MEM     TIME+ COMMAND
 1607 jarrod   20   0 2333568 974888 212944 S  12.5 12.4  11:10.67 firefox
 3366 jarrod   20   0  159828   4312   3624 R   6.2  0.1   0:00.01 top
    1 root     20   0  193892   8484   5636 S   0.0  0.1   0:01.78 systemd
To quit top, type q.
Signaling
Let’s see how to build up a command to kill firefox using some of the tools
we’ve seen. First let’s pipe the output of ps -e to grep to select
the line corresponding to firefox:
$ ps -e | grep firefox
16517 ?        00:10:03 firefox
We can now use awk to select the first column, which contains the process
ID corresponding to firefox:
$ ps -e | grep firefox | awk '{ print $1 }'
16517
Finally, we can pipe this to the kill command using xargs:
$ ps -e | grep firefox | awk '{ print $1 }' | xargs kill
Job Control
When you run a command in a shell by simply typing its name, you are
said to be running in the foreground. When a job is running in the
foreground, you can’t type additional commands into that shell session,
but there are two signals that can be sent to the running job through
the keyboard. To interrupt a program running in the foreground, use
Ctrl-c; to quit a program, use Ctrl-\. While modern windowed systems
have lessened the inconvenience of tying up a shell with foreground
processes, there are some situations where running in the foreground is
not adequate.
The primary need for an alternative to foreground processing arises when
you wish to have jobs continue to run after you log off the computer. In
cases like this you can run a program in the background by simply
terminating the command with an ampersand (&). However, before putting
a job in the background, you should consider how you will access its
results, since stdout is not preserved when you log off from the
computer. Thus, redirection (including redirection of stderr) is
essential when running jobs in the background. As a simple example,
suppose that you wish to run an R script, and you don’t want it to
terminate when you log off. (Note that this can also be done using
R CMD BATCH, so this is primarily an illustration.)
$ R --no-save < code.R > code.Rout 2>&1 &
If you forget to put a job in the background when you first execute
it, you can do it while it’s running in the foreground in two steps.
First, suspend the job using the Ctrl-z signal. After receiving the
signal, the program will interrupt execution, but will still have
access to all files and other resources. Next, issue the bg
command, which will start the stopped job running in the background.
Listing and killing jobs
Since only foreground jobs will accept signals through the keyboard, if you
want to terminate a background job you must first determine the unique process
id (PID) for the process you wish to terminate through the use of the ps
command.
To see all processes owned by a specific user (e.g., jarrod), I can use
the -U jarrod option:
$ ps -U jarrod
If I want to get more information (e.g., %CPU and %MEM), I can use
add the -u option:
$ ps -U jarrod -u
USER       PID %CPU %MEM    VSZ   RSS TTY      STAT START    TIME COMMAND
jarrod   16116 12.0  6.0 118804  5080 tty1     Ss   16:25  133:01 python
In this example, the ps output tells us that this python job has a PID of
16116, that it has been running for 133 minutes, is using 12%
of CPU and 6% of memory, and that it started at 16:25. You could
then issue the command:
$ kill 11998
or, if that doesn’t work:
$ kill -9 11998
to terminate the job. Another useful command in this regard is
killall, which accepts a program name instead of a process id, and
will kill all instances of the named program:
$ killall R
Of course, it will only kill the jobs that belong to you, so it will
not affect the jobs of other users. Note that the ps and kill
commands only apply to the particular computer on which they are
executed, not to the entire computer network. Thus, if you start a job
on one machine, you must log back into that same machine in order to
manage your job.
Monitoring jobs and memory use
As we saw above, the top command also allows you to monitor the jobs on the
system and in real-time. In particular, it’s useful for seeing how much of the
CPU and how much memory is being used, as well as figuring out a PID as an
alternative to ps. You can also renice jobs (see below) and kill jobs from
within top: just type r or k, respectively, and proceed from there.
One of the main things to watch out for is a job that is using close to 100% of memory and much less than 100% of CPU. What is generally happening is that your program has run out of memory and is using virtual memory on disk, spending most of its time writing to/from disk, sometimes called paging or swapping. If this happens, it can be a very long time, if ever, before your job finishes.
Nicing a job
The most important thing to remember when starting a job on a machine that is not your personal machine is how to be a good citizen. This often involves ‘nicing’ your jobs. Nicing a job puts it at a lower priority so that a user working at the keyboard has higher priority in using the CPU. Here’s how to do it, giving the job a low priority of 19:
$ nice -19 R CMD BATCH --no-save code.R code.Rout &
If you forget and just submit the job without nicing, you can reduce the priority by doing:
$ renice +19 11998
where 11998 is the PID of your job.
Screen
Screen allows you to create virtual terminals, which are not connected to your actual terminal or shell. This allows you to run multiple programs from the commandline and leave them all in the foreground in their own virtual terminal. Screen provides facilities for managing several virtual terminals including listing them, switching between them, disconnecting from one machine and then reconnecting from another. While we will only discuss its basic operation, we will cover enough to be of regular use.
Calling screen
$ screen
will open a single window and you will see a new bash prompt. You just work
at this prompt as you normally would. The difference is that you can disconnect
from this window by typing Ctrl-a d and you will see something like this
$ screen
[detached from 23974.pts-2.t430u]
Tip
All the screen key commands begin with the control key combination Ctrl-a
followed by another key. For instance, when you are in a screen session and
type Ctrl-a ?, screen will display a help screen with a list of its
keybindings.
You can now list your screen sessions
$ screen -ls
There is a screen on:
        23974.pts-2.t430u       (Detached)
To reconnect
$ screen -r
You can start multiple screen sessions. This is what it might look like if you have 3 screen sessions:
$ screen -ls
There are screens on:
        24274.pts-2.t430u       (Attached)
        24216.pts-2.t430u       (Detached)
        24158.pts-2.t430u       (Detached)
To specify that you want to reattach to session 24158.pts-2.t430u, type:
$ screen -r 24158.pts-2.t430u
If you have several screen sessions, you will want to name your screen session
something more informative than 24158.pts-2.t430u. To
name a screen session gene-analysis you can use the -S option when calling
screen:
$ screen -S gene-analysis
While there are many more features and keybindings available for screen, you’ve already seen enough screen to be useful. For example, imagine you ssh to a remote machine from your laptop to run an analysis. The first thing you do at the bash prompt on the remote machine is:
$ screen -S dbox-study
Then you start your analysis script dbox-analysis.py running:
$ dbox-analysis.py
Starting statistical analysis ...
Processing subject 1 ...
Processing subject 2 ...
If your study has 50 subjects and processing each subject takes 20 minutes,
you will not want to sit there watching your monitor. So you use Ctrl-a d
to detach the session and you will then see:
$ screen -S dbox-study
[detached from 2799.dbox-study]
$
Now you can log off your laptop and go home. Sometime after dinner, you decide to check on your job. So you ssh from your home computer to the remote machine again and type the following at the bash prompt:
$ screen -r dbox-study
Shell programming
Shell scripts are files containing shell commands (commonly with the extension
.sh) To run a shell script called file.sh, you would type
$ source ./file.sh
or
$ . ./file.sh
Note that if you just typed file.sh, the operating system will generally
have trouble finding the script and recognizing that it is executable. To be
sure that the operating system knows what shell to use to interpret the script,
the first line of the script should be #!/bin/bash (in the case that you’re
using the bash shell). Also, if you set file.sh to be executable (i.e., to
have the ‘x’ flag set) you can execute it by just typing ./file.sh.
Functions
You can define your own utilities by creating a shell function. This
allows you to automate things that are more complicated than you can do
with an alias. One nice thing about shell functions is that the shell
automatically takes care of function arguments for you. It places the
arguments given by the user into local variables in the function called
(in order): $1 $2 $3 etc. It also fills $# with the number of
arguments given by the user. Here’s an example of using arguments in a
function that saves me some typing when I want to copy a file to the SCF
filesystem:
function putscf() {
   scp $1 jarrod@scf-ug02.berkeley.edu:$2
}
To use this function, I just do the following to copy unit1.pdf from
the current directory on whatever non-SCF machine I’m on to the
directory ~/teaching/243 on SCF:
$ putscf unit1.pdf ~/teaching/243/.
Of course you’d want to put such functions in your .bashrc file.
If/then/else
We can use if-then-else type syntax to control the flow of a shell
script. For an example, here is a shell function niceR() that
can be used for nicing R jobs:
# niceR shortcut for nicing R jobs
# usage: niceR inputRfile outputRfile
# Author: Brian Caffo
# Date: 10/01/03

function niceR(){
    # submits nice'd R jobs
if [ $# != "2" ]
then
   echo "usage: niceR inputRfile outputfile"
elif [ -e "$2" ]
then
   echo "$2 exists, I won't overwrite"
elif [ ! -e "$1" ]
then
   echo "inputRfile $1 does not exist"
else
   echo "running R on $1"
   nice -n 19 R --no-save < $1 &> $2
fi
}
For more details, look in Newham&Rosenblatt or search online.
For loops
for loops in shell scripting are primarily designed for iterating through a set of files or directories. Here’s an example:
for file in $(ls *.txt)
do
   mv $file ${file/.txt/.R}
   # this syntax replaces .txt with .R in $file``
done
Another use of for loops is automating file downloads:
# example of bash for loop and wget for downloading a collection of files on the web
# usage: ./forloopDownload.sh
# Author: Chris Paciorek
# Date: July 28, 2011

url='ftp://ftp3.ncdc.noaa.gov/pub/data/3200'
IFS=:  # internal field separator
mths=jan:feb:mar:apr
for ((yr=1910; yr<=1920; yr++))
do
    for mth in ${mths}
    do
        wget ${url}/${yr}/3200${mth}${yr}
    done
done
for loops are very useful for starting a series of jobs:
# example of bash for loop for starting jobs
# usage: ./forloopJobs.sh
# Author: Chris Paciorek
# Date: July 28, 2011

n=100
for(( it=1; it<=100; it++));
do
    echo "n=$n; it=$it; source('base.R')" > tmp-$n-$it.R
    R CMD BATCH --no-save tmp-$n-$it.R sim-n$n-it$it.Rout
done
# note that base.R should NOT set either 'n' or 'it'
How much shell scripting should I learn?
We’ve covered most of what you are likely to need to know about the shell. I
tend to only use bash scripts for simple tasks that require only a few lines of
bash commands and very little control flow (i.e., conditional statements,
loops). For more complicated OS tasks, it is often preferable to use Python.
You can also do a fair amount of what you need from within R using the
system() function. This will enable you to avoid dealing with a lot of
shell programming syntax (but you’ll still need to know how to use UNIX
utilities, wildcards, and pipes to be effective).
Working with documents
There are many plain text file formats (e.g., markdown, reStructuredText,
LaTeX). Pandoc is a widely used document converter. To convert a file
written in markdown (report.md) to a PDF (report.pdf), you would
do something like:
$ pandoc -o report.pdf report.md
For a quick introduction to LaTeX, please see the “Introduction to LaTeX” tutorial and screencast here: http://statistics.berkeley.edu/computing/training/tutorials
Exercises
Make a variable, called
mypythonthat contains the path to Python on your machine.Construct a variable that has
<username>@<machinename>using existing environment variables and thehostnameutility.Figure out how to use the
mkdircommand to create the following directory structure in one short command:temp ├── proj1 │ ├── code │ └── data ├── proj2 │ ├── code │ └── data └── proj3 ├── code └── dataHow would you count the number of lines in an input file, say a data file.
Print the first three lines of a file to the screen. Now print just the third line to the screen.
Put the third line of a file in a new file.
Now add the fifth line of the file to that same file from the previous problem.
Extract the Australia data from the
cpds.csvdataset and put it in a file calledcpds_australia.csv. It’s OK if you do this in a straightforward way and it might fail if ‘Australia’ is present in an unexpected column.Find all the lines in a file that do not contain a comma. (You might use this to look for anomalies in a CSV file.)
Write shell code that creates files
file1.txt,file2.txt,file3.txt, etc., with the word ‘blah’ as the only line in each file.Write shell code that modifies each file from the previous problem so that the number
1,2,3, etc. is prepended to the appropriate file (i.e., there is a new first line in each file that simply contains the number corresponding to the file name).You may want to write the code to do this operation on a single file before embedding the code in the loop.
Create a shell function that will run a Python job in the background such that I can run the job by typing:
$ bpy file.py file.out
You can create a test jobs with:
echo -e 'a=5\nprint(a)' > file.pyModify the function so that you can simply type
$ bpy file.py
and it will use
file.pyoutas the output fileUse
psto print out all the processes on the machine with information on memory and CPU use and sort the output ofpsin decreasing order of memory use.Take
$mypythonfrom the first problem and strip thepythonoff the end—assigning the result to a new variable,path_to_py.
